适用于 iOS 的“材质设计”下拉列表
![]()
![]()
![]()
![]()
![]()
![]()
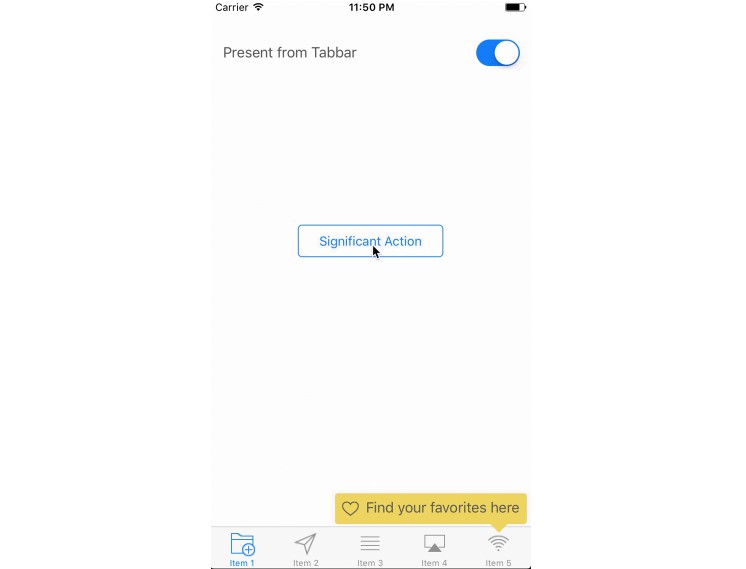
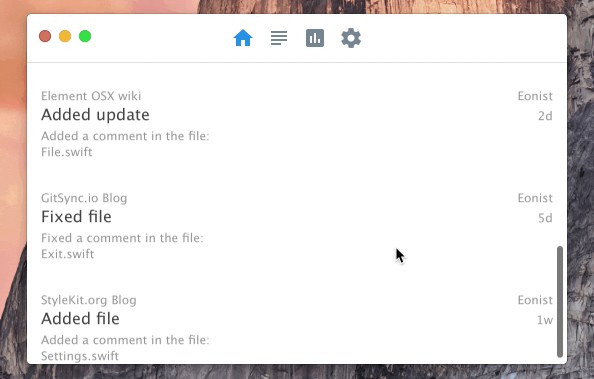
用 Swift 编写的 iOS 材质设计下拉菜单。


Demo
Do in your console and run the project to try a demo.
To install CocoaPods, run in your console.pod try DropDownsudo gem install cocoapods
Installation ?
DropDown supports Swift 5.0 since version .
supports Swift 4.2 since version .2.3.13DropDown2.3.4
If you need Swift 4.0, use version 2.3.2:
- Manually: use tag
2.3.2 - CocoaPods:
pod 'DropDown', '2.3.2' - Carthage:
github "AssistoLab/DropDown" == 2.3.2
CocoaPods
Use CocoaPods.
- Add to your Podfile.
pod 'DropDown' - Install the pod(s) by running .
pod install - Add in the .swift files where you want to use it
import DropDown
Carthage
Use Carthage.
- Create a file name .
Cartfile - Add the line .
github "AssistoLab/DropDown" - Run .
carthage update - Drag the built into your Xcode project.
DropDown.framework
Source files
A regular way to use DropDown in your project would be using Embedded Framework. There are two approaches, using source code and adding submodule.
Add source code:
- Download the latest code version.
- Unzip the download file, copy folder to your project folder
DropDown
Add submodule
- In your favorite terminal, into your top-level project directory, and entering the following command:
cd
After you get the source code either by adding it directly or using submodule, then do the following steps:
- Open folder, and drag into the file navigator of your app project, under you app project.
DropDownDropDown.xcodeproj - In Xcode, navigate to the target configuration window by clicking the blue project icon, and selecting the application target under the "Targets" heading in the sidebar.
- Open "Build Phases" panel in the tab bar at the top of the window, expend the "Target Dependencies" group and add under DropDown icon in the popup window by clicking . Similarly, you can also add in "Embedded Binaries" under "General" tab.
DropDown.framework+DropDown.framework
Basic usage ✨
Optional properties:
Display actions:
Important ⚠️
Don't forget to put:
in your 's method so that the drop down will handle its display with the keyboard displayed even the first time a drop down is showed.AppDelegatedidFinishLaunching
Advanced usage ?
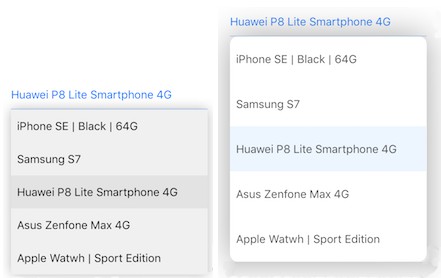
Direction
The drop down can be shown below or above the anchor view with:
With the drop down will try to displa itself below the anchor view when possible, otherwise above if there is more place than below.
You can restrict the possible directions by using or ..any.top.bottom
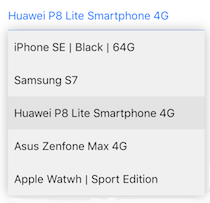
Offset
By default, the drop down will be shown onto to anchor view. It will hide it.
If you need the drop down to be below your anchor view when the direction of the drop down is , you can precise an offset like this:.bottom
If you set the drop down direction to or you can also precise the offset when the drop down will shown above like this:.any.top
Note the minus sign here that is use to offset to the top.
Cell configuration
Formatted text
By default, the cells in the drop down have the values as text.
If you want a custom formatted text for the cells, you can set like this:dataSourcecellConfiguration
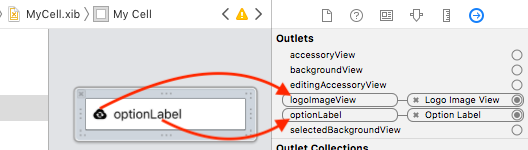
Custom cell
You can also create your own custom cell, from your .xib file. To have something like this for example:
You can check out a concrete example in the Demo inside this project (go to , line 125).ViewController.swift
For this you have to:
- Create a
DropDownCellsubclass (e.g. MyCell.swift)
- Create your custom xib (e.g. MyCell.xib) and design your cell view in it
- Link the cell in your xib to your custom class
- At least have a label in your xib to link to the
optionLabelin code ( is a property ofIBOutletoptionLabelDropDownCell)

- Then, you simply need to do this:
- And you're good to go! ?
For a complete example, don't hesitate to check the demo app and code.
Events
Dismiss modes
You have 3 dismiss mode with the enum:DismissMode
onTap: A tap oustide the drop down is needed to dismiss it (Default)automatic: No tap is needed to dismiss the drop down. As soon as the user interact with anything else than the drop down, the drop down is dismissedmanual: The drop down can only be dismissed manually (in code)
Others
You can manually (pre)select a row with:
The data source is reloaded automatically when changing the property.
If needed, you can reload the data source manually by doing:dataSource
You can get info about the selected item at any time with this:
Customize UI ?
You can customize these properties of the drop down:
textFont: the font of the text for each cells of the drop down.textColor: the color of the text for each cells of the drop down.selectedTextColor: the color of the text for selected cells of the drop down.backgroundColor: the background color of the drop down.selectionBackgroundColor: the background color of the selected cell in the drop down.cellHeight: the height of the drop down cells.dimmedBackgroundColor: the color of the background (behind the drop down, covering the entire screen).cornerRadius: the corner radius of the drop down (see info below if you encounter any issue)setupMaskedCorners: the masked corners of the dropdown. Use this along with to set the corner radius only on certain corners.cornerRadius
You can change them through each instance of or via like this for example:DropDownUIAppearance
Expert mode ?
when calling the method, it returns a tuple like this:show
canBeDisplayed: Tells if there is enough height to display the drop down. If its value is , the drop down is not showed.falseoffscreenHeight: If the drop down was not able to show all cells from the data source at once, will contain the height needed to display all cells at once (without having to scroll through them). This can be used in a scroll view or table view to scroll enough before showing the drop down.offscreenHeight
Issues
If you experience the compiler error "Ambiguous use of 'cornerRadius'" on line:
Please use intead:
Requirements
- Xcode 8+
- Swift 3.0
- iOS 8+
- ARC
License
This project is under MIT license. For more information, see file.LICENSE
Credits
DropDown was inspired by the Material Design version of the Simple Menu.
DropDown was done to integrate in a project I work on:

It will be updated when necessary and fixes will be done as soon as discovered to keep it up to date.
I work at
![]()
You can find me on Twitter @kevinh6113.
Enjoy!