优雅的库,用于在 Swift 中管理视图和模型之间的交互
用于管理视图和模型之间交互的助手
![]()


![]()
![]()
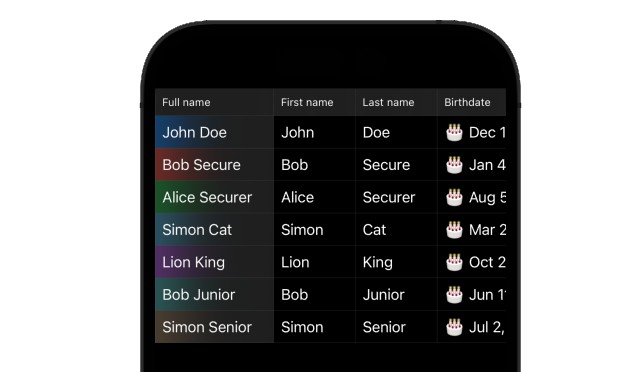
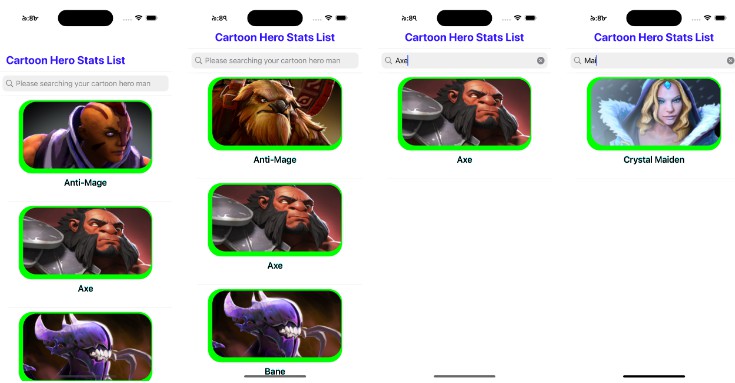
模型助手是视图和模型之间的中介。此框架经过定制,可与呈现对象集合的视图结合使用。
这些视图通常希望其数据源将结果显示为由行组成的部分列表。模型助手可以有效地分析模型对象并按部分对其进行分类。此外,它还根据模型对象更改将采用的视图更新为其委托。
特征
- [x] 插入/删除/排序/更新模型对象
- [x] 通知对视图的更改
- [x] 与 UITableView 和 UICollectionView 完全兼容
- [x] 支持部分
- [x] Supports index titles
- [x] Compatible with Server data source
- [x] Compatible with all kind of persistent stores
- [x] Compatible with all design patterns
- [x] Easy to use
- [x] Thread safe
- [x] Fault Ability
- [x] Complete Documentation
What's New:
Version 1.1.3:
Now using modelAssitant is really easy with just two lines of codes, and delegates will be implement automatically to your collection view.
See Usage for new way of implementing modelAssistant.
Version 1.0.8.3:
Upgraded to Swift 5
Version 1.0.8:
- Fault Ability: Now you can make entities in an specific range fault or fire them. For more information see Advanced Usage
Requirements
- iOS 8.0+
- Xcode 8.3+
- Swift 3.1+
Installation
CocoaPods
CocoaPods is a dependency manager for Cocoa projects. You can install it with the following command:
To integrate ModelAssistant into your Xcode project using CocoaPods, specify it in your :Podfile
If you are not upgraded to Swift 4.2, use the last non-swift 4.2 compatible release:
If you are using swift 4, replace with this:pod 'ModelAssistant'
If you are using swift 3, replace with this:pod 'ModelAssistant'
Carthage
Carthage is a decentralized dependency manager that builds your dependencies and provides you with binary frameworks.
You can install Carthage with Homebrew using the following command:
To integrate ModelAssistant into your Xcode project using Carthage, specify it in your :Cartfile
Run to build the framework and drag the built into your Xcode project.carthage update --platform iOSModelAssistant.framework
Manually
If you prefer not to use any of the aforementioned dependency managers, you can integrate ModelAssistant into your project manually.
Embedded Framework
-
Open up Terminal, into your top-level project directory, and run the following command "if" your project is not initialized as a git repository:
cd -
Add ModelAssistant as a git submodule by running the following command:
-
Open the new folder, and drag the into the Project Navigator of your application's Xcode project.
ModelAssistantModelAssistant.xcodeprojIt should appear nested underneath your application's blue project icon. Whether it is above or below all the other Xcode groups does not matter.
-
Select the in the Project Navigator and verify the deployment target matches that of your application target.
ModelAssistant.xcodeproj -
Next, select your application project in the Project Navigator (blue project icon) to navigate to the target configuration window and select the application target under the "Targets" heading in the sidebar.
-
In the tab bar at the top of that window, open the "General" panel.
-
Click on the button under the "Embedded Binaries" section.
+ -
You will see two different folders each with a nested inside a folder.
ModelAssistant.xcodeprojModelAssistant.frameworkProductsIt does not matter which folder you choose from.
Products -
Select the .
ModelAssistant.framework -
And that's it!
The is automagically added as a target dependency, linked framework and embedded framework in a copy files build phase which is all you need to build on the simulator and a device.
ModelAssistant.framework
FAQ
What is the position of ModelAssistant in design patterns?
ModelAssistant is fully compatible with all kind of design patterns. It doesn't violate them, instead it finds its place and sit there!
As a guide the position of ModelAssistant in some of famous design patterns is as follows:
| Design Pattern | ModelAssistant Position |
|---|---|
| MVC | Controller |
| MVP | Presenter |
| MVVM | ViewModel |
| VIPER | Presenter |
Credits
ModelAssistant is owned and maintained by the Seyed Samad Gholamzadeh. You can follow me on Twitter at @ssamadgh for project updates and releases.
License
ModelAssistant is released under the MIT license. See LICENSE for details.