本地化:用 swift 编写的框架可以更轻松地本地化您的项目,改进了 i18n,包括故事板和字符串
本地化
![]()


![]()
![]()
![]()
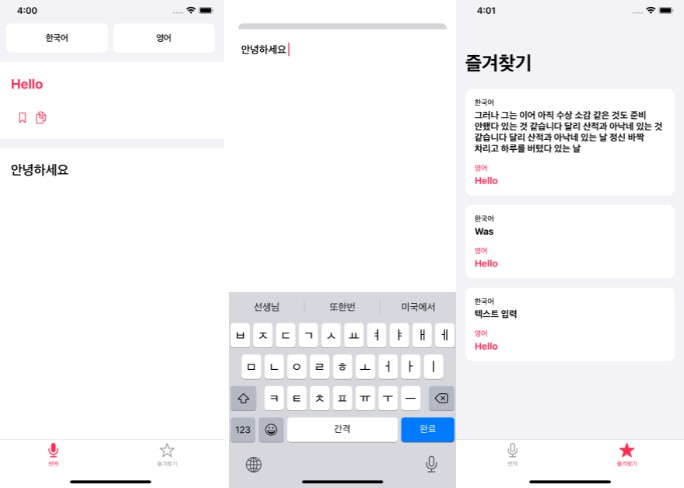
Localize 是一个用 swift 编写的框架,可帮助您本地化和多元化您的项目。它支持情节提要和字符串。

特征
- [x] 具有 IBInspectable 的故事板
- [x] Pluralize and localize your keys
- [x] Keep the File.strings files your app already uses
- [x] Support Apple strings and JSON Files
- [x] Change your app language without changing device language
- [x] Localize your Storyboards without extra files or/and ids
Requirements
- iOS 9.0+
- Xcode 8.0+
- Swift 3.0+
Installation
CocoaPods
CocoaPods is a dependency manager for Cocoa projects. You can install it with the following command:
CocoaPods 1.1.0+ is required to build Localize 1.+.
To integrate Localize into your Xcode project using CocoaPods, specify it in your :Podfile
Then, run the following command:
Carthage
Carthage is a decentralized dependency manager that builds your dependencies and provides you with binary frameworks.
You can install Carthage with Homebrew using the following command:
To integrate Localize into your Xcode project using Carthage, specify it in your :Cartfile
Run to build the framework and drag the built into your Xcode project.carthage updateLocalize.framework
Swift Package Manager
The Swift Package Manager is a tool for automating the distribution of Swift code and is integrated into the swift compiler.
Once you have your Swift package set up, adding Localize as a dependency is as easy as adding it to the dependencies value of your Package.swift.
Usage
Add for any if you want localize..localize()String
You don't need import anything in your code, Localize uses extensions to localize your Strings.
You can decide if you want use JSON or Apple Strings, we support both, if you decide to use JSON please follow these instructions.
Create JSON file
Please create a JSON file in your code with this rule:
For example
- lang-en.json
- lang-es.json
- lang-fr.json
Example JSON File
Create String file
If you decide use Apple strings, please follow Apple Localization Guide to create strings file.
String file example
Whatever way you choose to, use that methods.
Localize strings
Localize strings, replacing text
Localize use identifier to replace the text%
Localize strings, replacing many texts
Localize use identifier to replace the text%
Localize strings, replacing dictionary values
Localize use to search your id in JSON File:yourid
Localize strings, using other files
If you decide use different files use methods with in the end of each method, for example.tableName
We are amazing with storyboards
You don't need to import anything in your code, Localize uses extensions to localize your UIView components
To prevent auto localization for some controls you created in storyboard can set Auto Localize to Off

- lang-en.json
You can use extensions for
UIBarButtonItemUIButtonUILabelUINavigationItemUISearchBarUISegmentedControlUITabBarItemUITextFieldUITextView
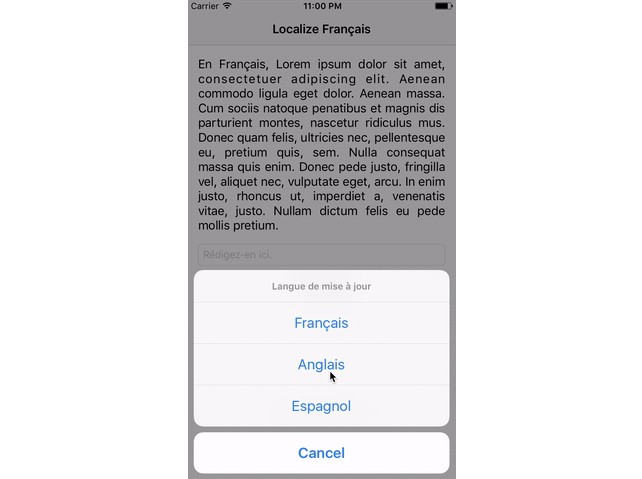
Updating language
When you change a language, automatically all views update your content to new language
To make this work with strings, you need to implement a notification
Implementing internal acction to change a language
Config
This not is necesary, only if you need different results.
Pluralize
how you need compose your file.
but also you can show your value
in your file
Notes for your AppStore release
To make all languages you have localized your app for visible on the AppStore, you must add a language in the project's settings.
- For that, click on your project name in the left side bar.
- Then, choose project, instead of a target.
- At the bottom, under Localizations, press the + button & select a language you want to add
- On prompt, uncheck all files Xcode wants to add localization for, but keep a single one, that you won't actually localize, such as your launch screen for instance.
- if you need to localize all your files, I suggest adding a placeholder storyboard file that you'll then add to localization
- Done! (You don't actually have to localize the placehodler file.) The AppStore will now show the new language in localizations for your app.
Credits
Special thanks to Benjamin Erhart
License
Localize is released under the MIT license. See LICENSE for details.