在 SwiftUI 中显示 Toast 或弹出窗口的简单方法
ToastSwiftUI
在 SwiftUI 中显示 Toast 或弹出窗口的简单方法
大约
SwiftUI是苹果在2019年为iOS开发者带来的一件好事。但它仍然没有为我们提供一种展示祝酒词的方式,一个短时间的信息。Toast 消息在 iOS 应用程序中非常流行,即使它不是本机视图。这个 ToastSwiftUI 开源将帮助您轻松做到这一点。
显示弹出窗口是一样的,不是太难,但没有本机 API。这个开源也可以帮助你。

例
若要运行示例项目,请克隆存储库,然后首先从示例目录运行。pod install
要求
- Swift 5.0 或更高版本
- iOS 13 或更高版本
安装
可可豆荚
ToastSwiftUI 可通过 CocoaPods 获得。要安装
它,只需将以下行添加到您的 Podfile 中:
pod 'ToastSwiftUI'
然后在命令行中运行。pod install
Swift Package Manager
在 Xcode 中,选择菜单文件 -> Swift Packages -> Add Package Dependency。选择一个目标,然后将此链接添加到输入字段:
https://github.com/huynguyencong/ToastSwiftUI.git
手动
有时您不想使用 Cocoapod 进行安装。在这种情况下,您需要手动添加它。这很简单,只需将 Swift 文件添加到您的项目中即可。ToastSwiftUI/Classes
Usage
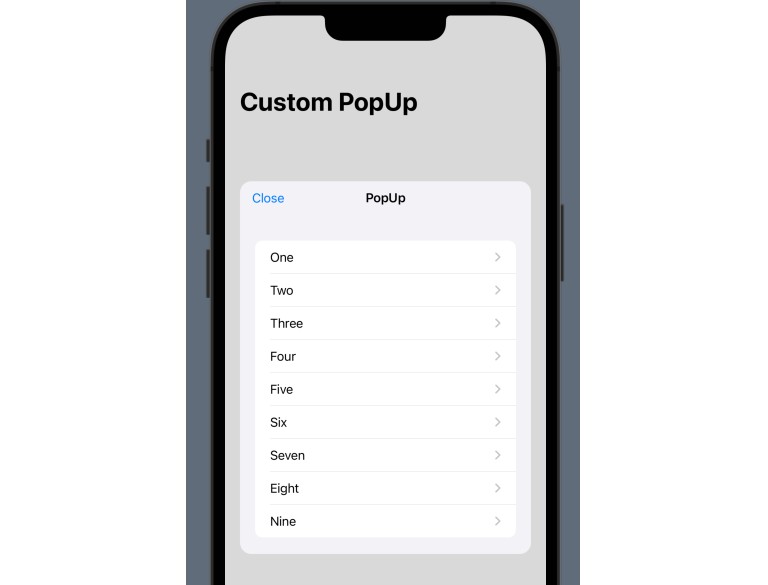
Showing a popup
- Step 1: Add a @State variable to control when showing the popup.
@State private var isPresentingPopup = false
- Step 2: Add modifier to your view with the binding variable in step 1. is a view that you want to show as a popup. Setting frame is not necessary if you are happy with the intrinsic size of the pop up view
popupMyPopup
.popup(isPresenting: $isPresentingPopup, overlayColor: Color.black.opacity(0.4)) {
    MyPopup(isPresenting: $isPresentingPopup)
        .frame(width: 300, height: 500)         // it is not required
}
- Step 3: Show the toast by set variable in the step 1 to true. You can also dismiss it by set it to false:
self.isPresentingPopup = true
Showing a toast
- Step 1: Add a @State variable to control when showing the toast.
@State private var isPresentingToast = false
- Step 2: Add modifier to your view with the binding variable in step 1.
toast
.toast(isPresenting: $isPresentingToast, message: "Success", icon: .success)
- Step 3: Show the toast by set variable in the step 1 to true. You can also dismiss it by set it to false:
self.isPresentingPopup = true
Showing a toast with a message state variable
- Step 1: Add a optional variable. When this optional variable has value, it will trigger a toast.
String@State
@State private var toastMessage: String?
- Step 2: Add modifier, pass the ($) of the above message variable as the first param.
toastBinding
.toast($toastMessage)
- Step 3: Show the toast by setting variable in the step 1 to a . You can also dismiss it by set it to :
Stringnil
toastMessage = "Hello world!"
See the completed code below, it has 3 examples to show both toast and popup in different way:
import SwiftUI
import ToastSwiftUI

struct ContentView: View {
    // 1.1. Example 1: Add @State variables to control when showing the popup
    @State private var isPresentingPopup = false

    // 1.2. Example 2: First way to show a toast. Add @State variables to control when showing the toast
    @State private var isPresentingToast = false

    // 1.3. Example 3: Second way to show a toast. Add an optional String @State variables to control when showing the toast
    @State private var toastMessage: String?

    @State private var count = 0

    var body: some View {
        VStack(spacing: 20) {
            Button("Show a success toast with a boolean variable") {
                // 3.2.1. Set state variable to true if you want to show the toast
                self.isPresentingToast = true
            }

            Button("Dismiss the success toast") {
                // 3.2.2. Set state variable to false if you want to hide the toast
                self.isPresentingToast = false
            }

            Divider()

            Button("Show toast with a text binding") {
                // 3.3.1. Set text variable you want to show
                toastMessage = "Toast number \(count)"

                count += 1
            }

            Button("Dismiss toast") {
                // 3.3.2. Set text variable to nil
                self.toastMessage = nil
            }

            Divider()

            Button("Show popup") {
                // 3.1.1. Set state variable to true if you want to show the popup
                self.isPresentingPopup = true
            }

            Button("Dismiss popup") {
                // 3.1.2. Set state variable to true if you want to hide the popup
                self.isPresentingPopup = false
            }

            Spacer()
        }
        .padding()

        // 2.1. Add a `popup` modifier to your view with the binding variable in step 1
        .popup(isPresenting: $isPresentingPopup, popup:
            MyPopup(isPresenting: $isPresentingPopup)
                .background(Color(.systemBackground))
        )

        // 2.2. Add a `toast` modifier to your view with the binding variable in step 1
        .toast(isPresenting: $isPresentingToast, message: "Success", icon: .success)

        // 2.3. Add a `toast` modifier to your view with the binding variable in step 1
        .toast($toastMessage)
    }
}
Customization
popup modifier parameters:
-
autoDismiss
- none: No auto dismiss, you have to dismiss manually.
- after(TimeInterval): Auto dismiss after a duration that you pass to.
- auto(String): Auto dissmiss after a duration that calculated base on the text you show.
-
hasShadow
-
cornerRadius
-
overlayColor
-
isTapOutsideToDismiss
toast modifier parameters:
-
autoDismiss
- none: No auto dismiss, you have to dismiss manually.
- after(TimeInterval): Auto dismiss after a duration that you pass to.
- auto: Auto dissmiss after a duration that calculated base on the text you show.
-
icon
- info
- error
- success
- custom(Image): Show icon as the image you provided.
- loading: Show icon as a rotating loading indicator.
-
backgroundColor
-
textColor
UIKit version
Author
Huy Nguyen, conghuy2012@gmail.com
License
ToastSwiftUI is available under the MIT license. See the LICENSE file for more info.