一个 SwiftUI 文本编辑器,使用突出显示语法.js
代码编辑器

![]()
一个 SwiftUI 文本编辑器视图,其中使用突出显示.js进行语法突出显示。
它建立在 Highlightr 之上,该 Highlightr 执行 Highlight.js 的包装。 然后,CodeEditor 将内容打包到 SwiftUI。
SVG Shaper for SwiftUI 中的用法示例(用于编辑 SVG 和 Swift 源代码):

(整形器实际上并没有使用荧光笔,但在其他方面非常相似)。
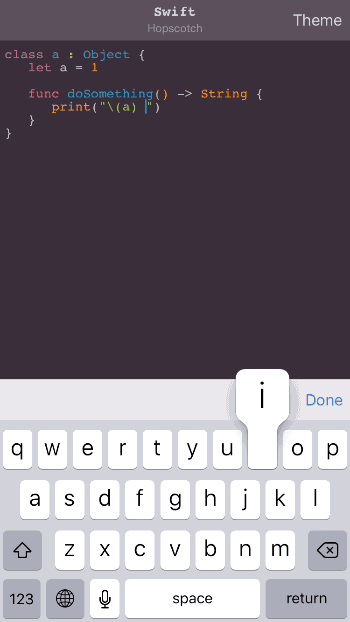
荧光笔示例:
Usage
Adding the Package
The Swift package URL is: https://github.com/ZeeZide/CodeEditor.git
Using it in a SwiftUI App
To use as a source code viewer, simply pass the source code
as a string:CodeEditor
struct ContentView: View {

    var body: some View {
        CodeEditor(source: "let a = 42")
    }
}
If it should act as an actual editor, pass in a string :Binding
struct ContentView: View {

    @State private var source = "let a = 42\n"

    var body: some View {
        CodeEditor(source: $source, language: .swift, theme: .ocean)
    }
}
Languages and Themes
Highlight.js. supports more than 180 languages and over 80 different themes.
The available languages and themes can be accessed using:
CodeEditor.availableLanguages
CodeEditor.availableThemes
They can be used in a SwiftUI like so:Picker
struct MyEditor: View {

    @State private var source   = "let it = be"
    @State private var language = CodeEditor.Language.swift

    var body: some View {
        Picker("Language", selection: $language) {
            ForEach(CodeEditor.availableLanguages) { language in
                Text("\(language.rawValue.capitalized)")
                    .tag(language)
            }
        }

        CodeEditor(source: $source, language: language)
    }
}
Note: The doesn’t do automatic theme changes if the appearance
changes.CodeEditor
Smart Indent and Open/Close Pairing
Inspired by NTYSmartTextView,
now also supports (on macOS):CodeEditor
- smarter indents (preserving the indent of the previous line)
- soft indents (insert a configurable amount of spaces if the user presses tabs)
- auto character pairing, e.g. when entering , the matching will be auto-added
{}
To enable smart indents, add the flag, e.g.:smartIndent
CodeEditor(source: $source, language: language,
           flags: [ .selectable, .editable, .smartIndent ])
It is enabled for editors by default.
To configure soft indents, use the parameter, e.g.indentStyle
CodeEditor(source: $source, language: language,
           indentStyle: .softTab(width: 2))
It defaults to tabs, as per system settings.
Auto character pairing is automatic based on the language. E.g. there is a set of
defaults for C like languages (e.g. Swift), Python or XML. The defaults can be overridden
using the respective static variable in ,
or the desired pairing can be set explicitly:CodeEditor
CodeEditor(source: $source, language: language,
           autoPairs: [ "{": "}", "<": ">", "'": "'" ])
Font Sizing
On macOS the editor supports sizing of the font (using Cmd +/Cmd – and the font panel). To enable sizing commands, the WindowScene needs to have the proper commands applied, e.g.:
WindowGroup {
    ContentView()
}
.commands {
    TextFormattingCommands()
}
To persist the size, the binding is available.fontSize
Selection and Scrolling
The selected text can be observed and modified via another :Binding
 struct ContentView: View {
    static private let initialSource = "let a = 42\n"

    @State private var source = Self.initialSource
    @State private var selection = Self.initialSource.endIndex..<Self.initialSource.endIndex

    var body: some View {
        CodeEditor(source: $source,
                   selection: $selection,
                   language: .swift,
                   theme: .ocean,
                   autoscroll: false)
        Button("Select All") {
            selection = source.startIndex..<source.endIndex
        }
    }
}
When is , the editor automatically scrolls to the respective
cursor position when is modfied from the outside, i.e. programatically.autoscrolltrueselection
Highlightr and Shaper
Based on the excellent Highlightr. This means that it is using JavaScriptCore as the actual driver. As Highlightr says:
It will never be as fast as a native solution, but it’s fast enough to be used on a real time editor.
The editor is similar to (but not exactly the same) the one used by SVG Shaper for SwiftUI, for its SVG and Swift editor parts.
Complete Example
import SwiftUI
import CodeEditor

struct ContentView: View {

  #if os(macOS)
    @AppStorage("fontsize") var fontSize = Int(NSFont.systemFontSize)
  #endif
  @State private var source = "let a = 42"
  @State private var language = CodeEditor.Language.swift
  @State private var theme    = CodeEditor.ThemeName.pojoaque

  var body: some View {
    VStack(spacing: 0) {
      HStack {
        Picker("Language", selection: $language) {
          ForEach(CodeEditor.availableLanguages) { language in
            Text("\(language.rawValue.capitalized)")
              .tag(language)
          }
        }
        Picker("Theme", selection: $theme) { theme in
          ForEach(CodeEditor.availableThemes) {
            Text("\(theme.rawValue.capitalized)")
              .tag(theme)
          }
        }
      }
      .padding()

      Divider()

      #if os(macOS)
        CodeEditor(source: $source, language: language, theme: theme,
                   fontSize: .init(get: { CGFloat(fontSize)  },
                                   set: { fontSize = Int($0) }))
          .frame(minWidth: 640, minHeight: 480)
      #else
        CodeEditor(source: $source, language: language, theme: theme)
      #endif
    }
  }
}

struct ContentView_Previews: PreviewProvider {
  static var previews: some View {
    ContentView()
  }
}
Who
CodeEditor is brought to you by ZeeZide. We like feedback, GitHub stars, cool contract work, presumably any form of praise you can think of.